What are the First Signs of Worn Piston Rings?
The most common indicator of internal engine wear is engine blow-by.
This occurs when the seal between the piston and the cylinder wall fails. If you notice puffs of blue smoke, your engine is burning oil—and your piston rings are likely the culprit.
As the engine warms up, worn piston rings expand and begin to seal against the cylinder walls. This reduces the amount of oil blowing past the rings; however, as wear progresses, the blue smoke will become constant.
Symptoms of Worn Piston Rings: What to Look For
When piston rings wear out, they lose their ability to seal the combustion chamber. Blow-by causes oil to enter the combustion chamber. Meanwhile, exhaust gases escape into the crankcase.
Quick Diagnosis Table
| Symptoms | What it Means | Priority |
|---|---|---|
| Blue Smoke | Oil is burning in the combustion chamber. | High |
| Oil Smells Like Gas | Blow-by is contaminating your oil supply. | Critical |
| Low Compression | Pressure is escaping past the rings. | High |
| Fouled Plugs | Oil is “leaking up” into the spark zone. | Medium |
1. Blue Exhaust Smoke
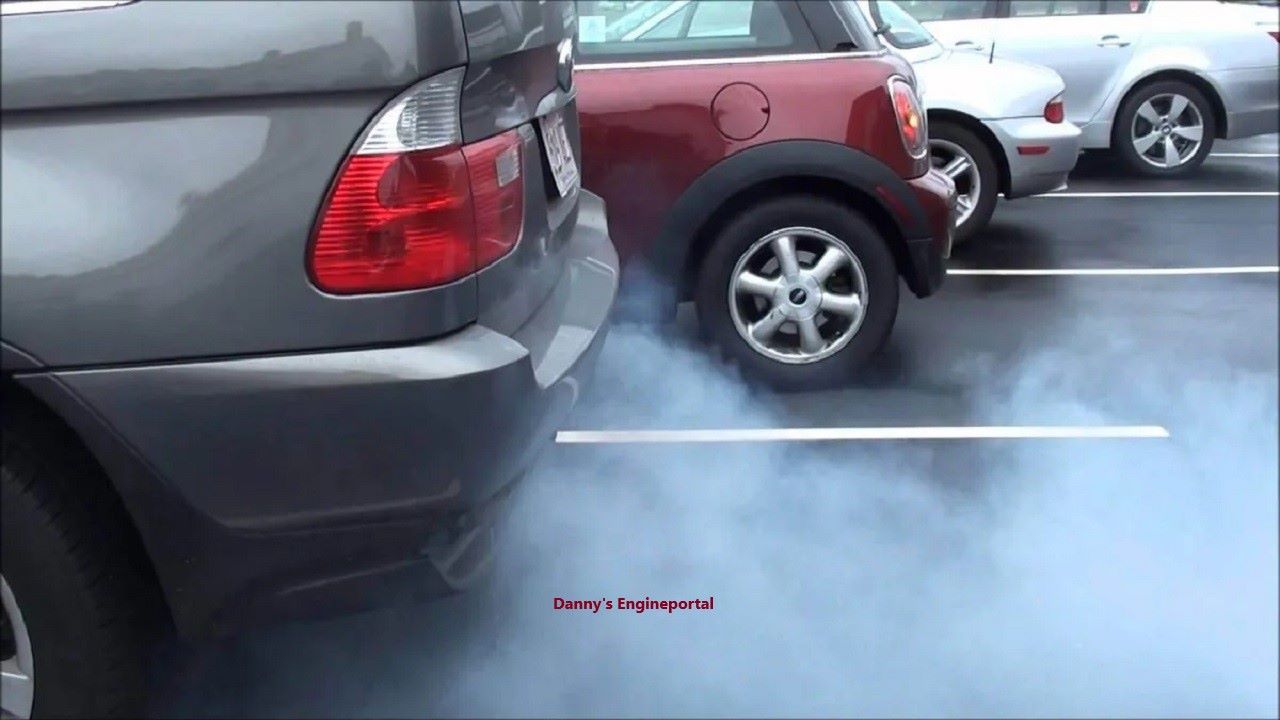
- Cold Start Smoke: You might notice blue smoke only when you first start the engine. This happens because the pistons and rings haven’t yet expanded to seal the cylinder walls.
- Constant Smoke: As wear worsens, the gaps become too large for heat expansion to fix. If you see blue smoke while idling or accelerating, the rings are likely past the point of no return.
In addition to smoke, you may notice you are constantly topping off your oil between changes. Worn rings allow oil to blow past and burn in the combustion chamber. This doesn’t just lower your oil level; it creates carbon buildup on your valves and cylinder heads.
Keep in mind blow-by doesn’t just move oil up; it moves combustion gases down into your oil pan (crankcase).
- Chemical Contamination: Fuel and combustion by-products mix with your engine oil.
Loss of Lubrication: These chemicals break down the oil’s viscosity, destroying its ability to cool and lubricate. - Bearing Damage: If your oil looks unusually thin or smells like gasoline, change it immediately to prevent catastrophic bearing failure.
4. Significant Loss of Power
When compression escapes into the crankcase instead of pushing the piston down, your engine loses its “punch.” This often leads to:
- Fouled Spark Plugs: Oil coating the plugs prevents a clean spark.
- Rough Idle: The engine may stumble or shake because of uneven compression across cylinders.
How to Confirm the Problem
Before tearing the engine down, perform these two tests:
- Dry Compression Test: Measures how much pressure each cylinder is holding.
- Wet Compression Test: Add a tablespoon of oil to the cylinder and re-test. If the PSI jumps, worn rings are likely the culprit. The oil temporarily sealed the gap.
Understanding Ring Configuration
Most modern engines utilize a three-ring design to maintain performance and reduce emissions.
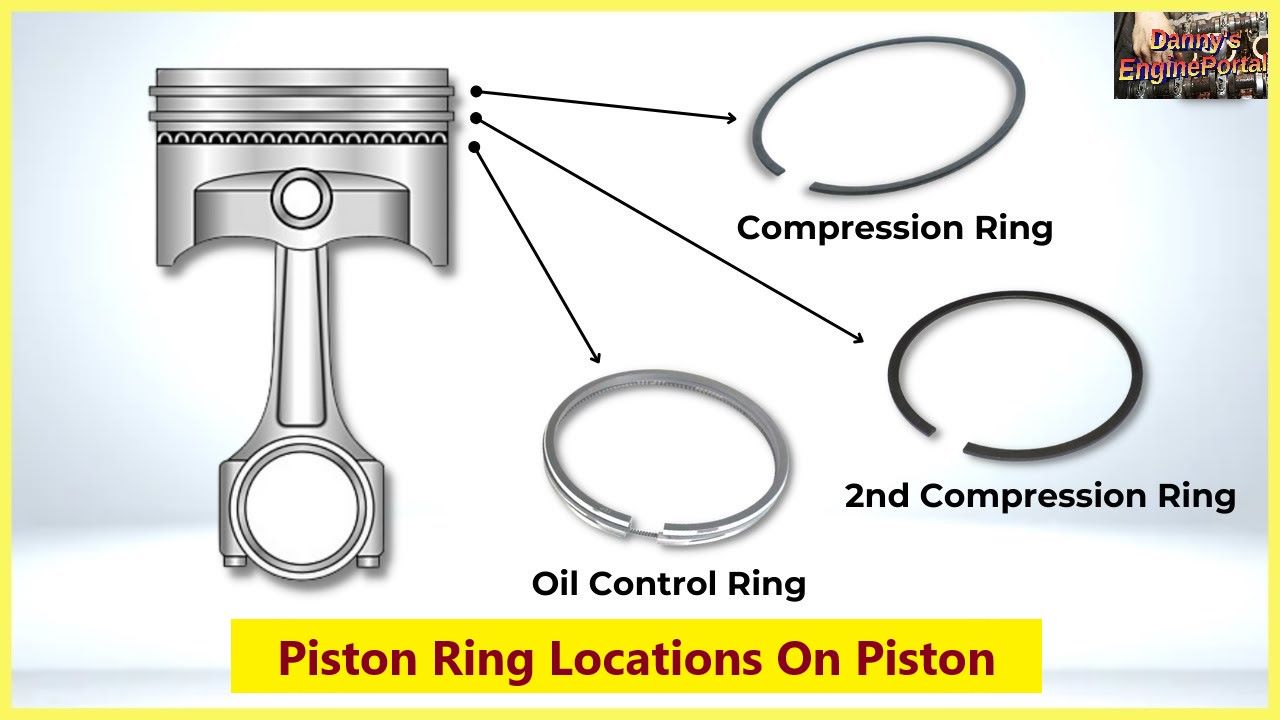
1. Compression Rings (Top Rings)
Located in the top grooves, these rings seal combustion pressure. They also transfer heat to the cylinder walls.
2. Intermediate Rings (Second Rings)
These help the top ring seal gases while “shearing” the oil layer left on the cylinder wall. This keeps it out of the combustion chamber.
3. Oil Control / Scraper Rings
These rings regulate the amount of lubricating oil on the cylinder walls. They spread it evenly, preventing it from passing into the combustion zone.
Pro Tip: Modern engines have incredibly tight clearances (.001 in. or less). Using anti-scuff moly-based coatings on piston skirts helps maintain these tolerances and reduces “piston rock.”
How to Install Piston Rings: Step-by-Step Guide
Follow these critical steps to ensure a perfect seal.
1. Identify Piston Ring Markings
To begin, you must check for orientation marks before fitting the rings. In fact, installing a ring upside down can actually double your engine’s oil consumption.
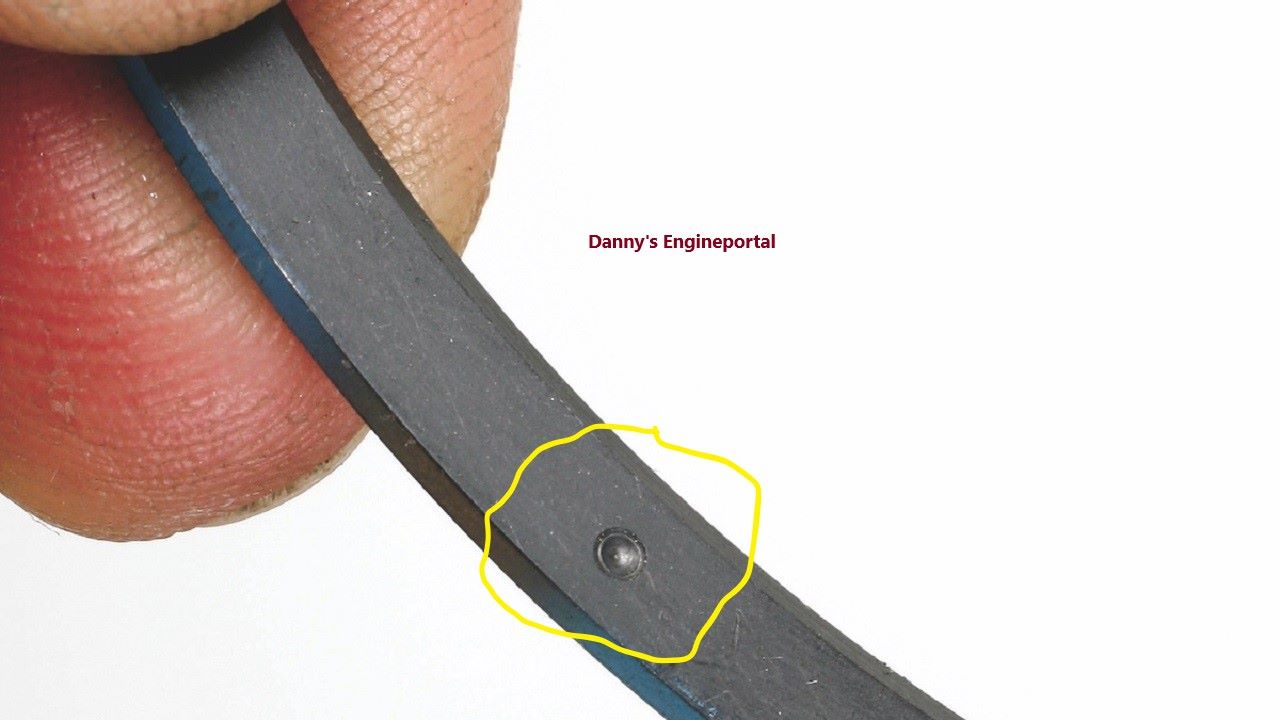
- However, if no dot is present, check the inside diameter for a bevel. Typically, this bevel should also face up.
- Alternatively, if there is a groove on the outside diameter and no other marks. Then you should install the ring with that groove facing down toward the bottom of the piston.
2. Measure Piston Ring End Gap
Keep in mind never assume that new rings are “drop-in” ready. Instead, you must verify the end gap within the cylinder bore itself.
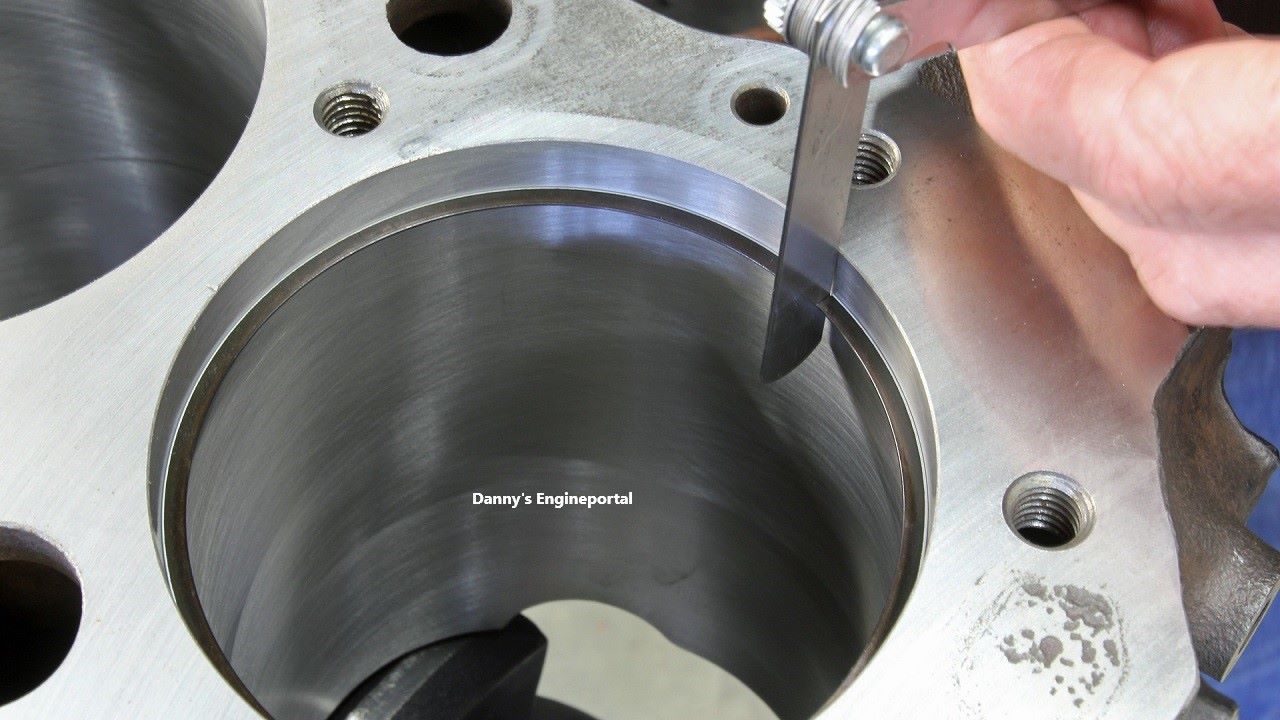
- First, measure the gap at both the top and the bottom of the cylinder.
- As a result of potential cylinder wear, you should always set the gap based on the bottom (the narrowest point).
- Also be sure to avoid placing any ring gaps directly over the piston pin holes to prevent pressure loss.
- If necessary, you can file-fit the rings for a perfect gap.
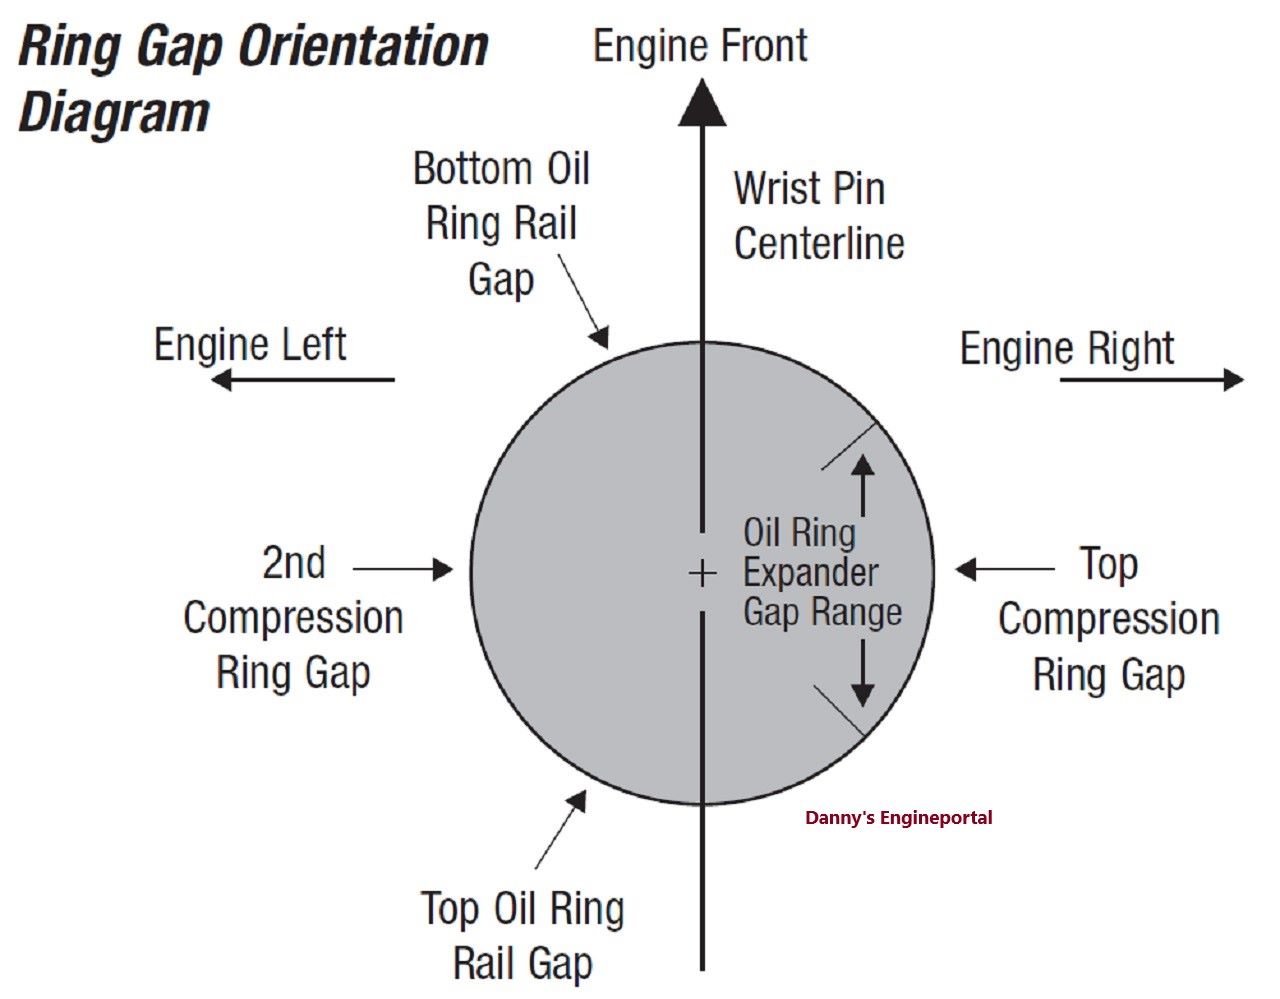
3. Use the Correct Tools
Once your measurements are confirmed, it is time to fit the rings. Never “spiral” rings onto a piston by hand. Doing so can permanently deform the metal and ruin the seal.
- Instead, always use a professional piston ring expander tool.
- Also you must position the ring end gaps 180 degrees apart. By doing so, you create a “labyrinth” path that significantly reduces blow-by gases.
4. Verify Ring-to-Groove Fit
Finally, double-check the fitment. For instance, never install shallow-groove rings on deep-groove pistons, otherwise, they will likely pop off. Conversely, deep-groove rings on shallow pistons will bottom out and jam.
- In conclusion, the most important final step is the “Final Clean.” After honing is complete, wash the cylinders with hot soapy water. Correct installation saves you from high oil consumption. It also prevents expensive bearing damage later.
Summary: Don’t Ignore the Signs of Worn Piston Rings
Piston rings are small components that do a massive job. From sealing combustion gases to cooling the piston, their health dictates the lifespan of your engine. Whether you are diagnosing blue exhaust smoke or preparing for a high-performance rebuild, precision is key.
Remember:
- Always measure your end gaps at the bottom of the bore.
- Cleanliness is king wash those cylinders with hot soapy water after honing!
If you’ve confirmed a loss of compression through a Wet Compression Test, it’s time to pull the pistons. Taking the time to install your rings correctly today will save you from a “thirst for oil”. And expensive bearing damage tomorrow.
Frequently Asked Questions (FAQ)
Q: Can you just replace piston rings without boring the cylinders?
A: Yes, but only if the cylinder taper remains within spec (usually under .003 to .005 inches) and the walls are properly honed. If the cylinder is too “out-of-round,” new rings will never seat correctly.
Q: How long does it take for new piston rings to seat?
A: Most modern rings seat within the first 20 to 50 miles of driving. Using a high-quality break-in oil and varying your engine RPM during this period is essential for a long-lasting seal. (avoiding steady highway speeds)
Q: What happens if I install a piston ring upside down?
A: An upside-down ring acts like a pump, pulling oil into the combustion chamber instead of scraping it away. This can result in massive oil consumption, fouled spark plugs, and blue exhaust “smoke” immediately after a rebuild.
Q: Why do I need to wash cylinders with soapy water after honing?
A: Honing leaves microscopic grit and metal debris within the cylinder crosshatch. Solvents and parts washers often fail to remove this material. Therefore, hot soapy water is essential to prevent premature ring wear.
“Thanks for reading!”