Professional installers offer the following information on, cleaning coolant mixed with oil, in the lubrication system.
However, the following information, applies only to certain situations. So, it is not applicable for all engines, that have coolant mixed with oil.
But, cleaning coolant mixed with oil in the lubrication system, will only work if there is no engine damage.
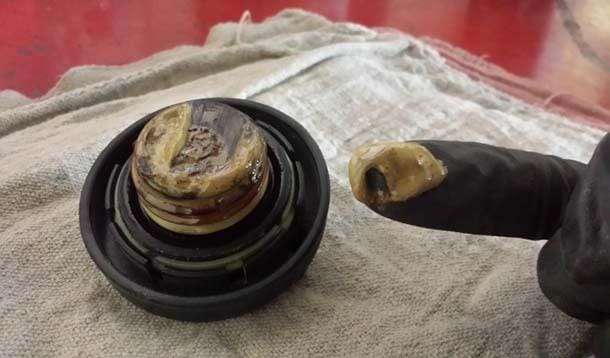
If you have coolant mixed with oil, you will notice a thick, milky or gravy-like substance. Consequently, that is a tell-tale sign, that you have this issue.
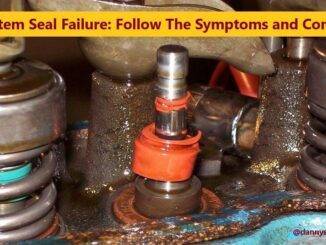
So, engine gaskets do a great job of keeping, vital components separated. But, as time goes by, they do degrade and can sometimes fail. The two most important things to keep separated, are oil and engine coolant. They do not mix, and can cause, extreme damage if they do.
Consequently, the most common causes for this to happen are:
- Blown or leaking head gaskets
- Leaking intake manifold gaskets
- Cracked cylinder head, or engine block
- Damaged engine oil cooler in the radiator
So, the engine cannot run with coolant mixed with oil, for an extended period of time. Because, it will not take long for the coolant, to start eating away at the engine bearings. Above all, do not run an engine, once coolant is discovered in the engine oil.
So, depending upon the amount of coolant, and the amount of time involved, serious engine damage, may not result immediately. In only those cases, the following cleaning operation may prove beneficial.
Note: Todays engine oils, already contain additives to clean your engine. But, all additive packages deplete with use. So, as the additives act to perform their function, they will be consumed. Hence, the importance of oil changes.
How To Clean Coolant Mixed With Oil, In The Lubrication System
First, determine the source and cause of the oil contamination, and “repair it”. Next, you are going to do a complete oil, and filter change. Because, oil is cheap, compared to the price of replacing your engine.
Step-1
Park your vehicle on level surface, engage the parking brake and turn off the engine. Then, if necessary, raise the front of vehicle, by driving it onto a ramp or by jacking it up.
Step-2
Open the hood. Remove the oil dipstick. Remove the oil filler cap. (Because, it helps the oil draining process) The oil may be thicker, because of coolant mixed with oil.
Step-3
Once the vehicle is safely and securely supported, put on safety glasses, and crawl under the vehicle. Locate the oil drain plug, which is on the bottom of the oil pan.
Step-4
Position a container, such as an approved oil catch pan, under the drain plug. Make sure the catch pan, is large enough to hold the volume of oil, expected to drain out. (There may be more, depending on amount of coolant in oil.)
Step-5
Loosen the drain plug, using a box-end wrench or 6-pt. socket. Carefully, remove the plug by hand, making sure the catch pan, is underneath the plug hole. Oil will flow rapidly from the hole. So, allow several minutes for all old oil to drain out.
Step-6
Wipe the oil pan threads and oil drain plug with a rag. Visually, inspect the condition of the oil pan, and oil drain plug threads and gasket. Buy a replacement drain plug, if you have any concerns about the condition of the plug. Replace the drain plug gasket, if needed (some OEMs recommend this). Once the oil is finished draining, reinstall the oil drain plug. Finally, tighten with the correct box-end wrench or 6-pt. socket, to the manufacturer specified torque. (See owner’s manual.)
Step-7
Locate the oil filter. Position an oil catch pan under the oil filter, to catch any residual coolant mixed with oil remaining inside filter. Loosen the oil filter, and allow the oil to drain from the oil filter. Remove the oil filter. Check to make sure the filter gasket has come off with the filter. If it’s stuck to the engine mounting plate, remove it and any remaining residue.
Step-8
Place a light coating of new oil on the gasket of the new oil filter, so it will install smoothly. By hand, install the new oil filter onto the engine, by turning in a clockwise direction. Once the oil filter gasket first contacts the mounting plate gasket surface, tighten the filter, according to proper directions. Generally, this is three-quarters to one full turn, after the filter gasket contacts the engine. (NOTE: Cartridge oil filter replacement procedures may differ. See owner’s or service manual for instructions.)
Step-9
Pour in the correct amount of new engine oil. (See vehicle’s owner’s manual for recommended grade, specs and amount.) Replace the oil fill cap and dipstick.
Step-10
Safely lower the vehicle to level ground. Start the engine and run at idle, for minimum of 30 seconds. Carefully inspect under the vehicle for oil leaks (especially by oil drain plug and oil filter). If leaks are visible, shut off the engine immediately and have the leaks repaired.
Step-11
Remove oil dipstick and check for proper oil level, adding more oil if necessary. (See the vehicle’s owner’s manual for oil capacity, and recommended oil level on dipstick.)
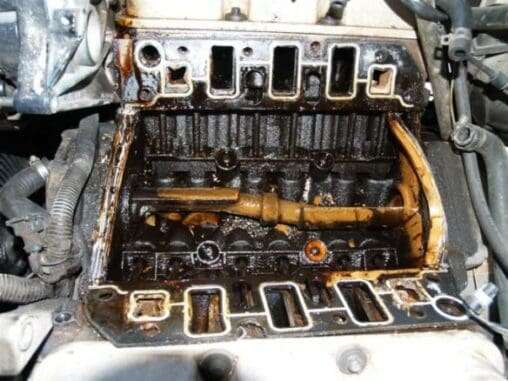
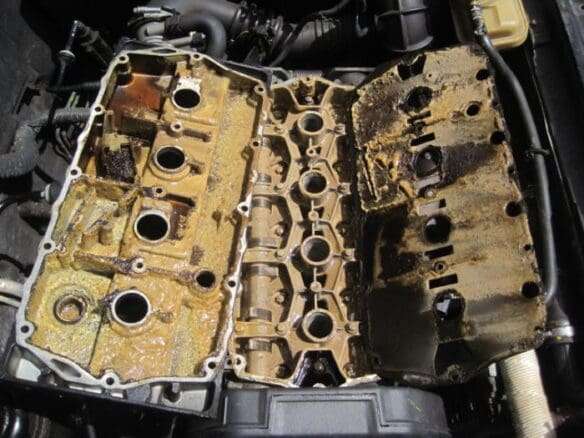
If You Waited Too Long Or The Damage Was Extreme, Your Engine Could Look Like This
These instructions are intended as, general guidelines. Please consult your owner’s or service manual for specific instructions on, changing the oil and filter on your vehicle.
Don’t be scared to repeat this procedure if necessary, Because, oil is cheap, compared to engine repairs. As a result of, Coolant Mixed With Oil.
If you want to do an engine flush, it is up to you. But, Note: Todays oils already contain additives to clean your engine. Some people are scared of chemicals, and do not want to flush the engine with them. So, if you have any reservations about disturbing sludge or deposits that may be holding your engine together, skip it. It’s up to you.
Conclusion
So, it is recommended to perform the above mentioned procedures, in a timely manner. And, after the above procedures have been carried out, check the engine oil pressure. Finally, the engine may be placed back in service, if those pressures are within the engine manufacturer’s requirements.
BY DANNY BENDER